Sanskrit for Common Yoga Postures
Sign up for email updates
Enjoy many exclusive benefits. Be the first to learn about all our upcoming programs.
Yoga can never cause Over-training
We brought you the t-shirt workout to help you carve the perfect torso. Now, we’re going one step further by bringing you the sleeveless t-shirt workout. This routine was designed to target the key muscles of your upper body that must look good if you’re going to dare go sleeveless: your biceps, delts, shoulders, and upper back. “Inverting the body with the Handstand Pushup, then having the arms go to pre-exhaustion fills the arms with blood, priming them for a great pump with the barbell curls,” says Corey Burnham, who programmed this routine. “Anybody can make a bicep look impressive when they curl their arm, but to have impressive arms even when they are straight by your side means that you have been doing the right, full body exercises,” says Burnhamwho notes that the Barbell Curl is one of the best moves for accomplishing this goal. “Go as heavy as possible on these, but keep very good form,” he notes.
What’s more: You’ll also hit your abs: “Having super buff arms without core engagement leads to poor athleticism and is not a good look for the summer,” says Burnham who added in Handstand Pushups and Pledge Planks to help activate your core in a way that forces them to dynamically stabilize the entire body.
“Fitness is not about being better than someone else… IT IS ABOUT BEING BETTER THAN YOU USED TO BE.”— Gordon Slanquit, Personal Trainer Association
When you’re finished with your workout, hang from a pull-up bar and simply relax. Then, walk on the treadmill or outside for about 15 minutes to improve circulation and ensure that your arms recover adequately.
Do this routine two to three days a week, but vary the volume of sets based on feel.
But, don’t stop after the workout ends. Use your arms throughout the day: make a fist, lift objects, glove up and hit a bag, carry your office bag with your grip, not your shoulder.
- Here’s how it works
Perform the first three moves one after another (Handstand Pushup Hold, Pledge Plank, Barbell Curl). Rest 45-60 seconds between exercises. That’s one set. Do up to 5-8 sets of these. Then, move on to the final two moves. Complete as many sets as possible with 30 seconds rest maximum. “You go until your form breaks, meaning you have nothing left”
Sign up for email updates
Enjoy many exclusive benefits. Be the first to learn about all our upcoming programs.
8 Tips for Teaching Yoga
As a yoga teacher, it’s important to guide your students in a way that allows them to get the most out of their yoga practice in a safe and effective way.
No matter what style of yoga you teach, you can follow certain guidelines to create an effective and inspiring class for you and your students. By incorporating some of the following teaching strategies, you will improve the overall experience for your students and yourself.
-
- Develop your own personal practice:
Only through your own personal practice can you find your unique voice as a teacher and gain a better understanding of how specific experiences will affect your students. Set aside time to maintain your own personal practice, along with attending classes from other instructors.
-
- Focus on your students and be with them:
By focusing on your students and their needs, rather than on how you are doing as a teacher, makes you less self-conscience and more confident and helpful. Walk the room, rather than staying in the front of the class. Be with your students so you can be more aware of what they need. Notice when someone needs help and offer an appropriate adjustment.
-
- Know your material:
The only way to truly feel confident teaching yoga is to know your material. This means understanding the effects of the yoga poses and breathing exercises you teach and understanding how they can benefit your students, as well as understanding the philosophy and history behind yoga.
-
- Be in the moment:
When you’re teaching or during your own personal practice, it is important to give your full attention to what you are doing. In your own practice, focus on each movement and on your breath. In your teaching, focus on the words you are saying as you say them and focus on the movements of each students and how you may be of help.
-
- Help students develop their inner awareness:
Remind students to focus on the feel of a movement, rather than how it looks or how they compare to other students. Encourage students to focus inward on the feeling of a pose and on their breath. This helps students stay present in the moment and connect movement and breath. Reinforce the idea that the goal of yoga is not to get into certain positions, it’s to become more aware of the present moment and more comfortable with our bodies and our movements, as well as to keep our bodies and minds healthy through movement and focus. We all have different anatomy. What’s hard for me may be easy for someone else, that doesn’t make them a better yogi. Being a great yogi means understanding and accepting your mind and body, and taking time to care for both properly.
-
- Help students become their own teachers:
Each student has two teachers: the outside teacher who guides them and their own inner guidance. Help your students develop their inner guidance, by helping them learn to connect with their bodies and make decisions about what works best for themselves. This way they can develop their own personal practice, and they can become more confident in their practice.
-
- Take it step by step:
Talk students through a pose step by step, emphasizing that they can stop at any step along the way. Encourage students to only go to their edge – challenging themselves, but not overdoing it. Encourage students to go to their “edge” that point where they feel challenged, yet their breath can remain smooth and steady.
-
- Connect breath and movement:
Breath plays an important role in yoga by keeping the mind focused on the body and by making movements more efficient by connecting breath with movement. Explain to students when to inhale and exhale. In yoga, it is usually best to inhale in expansion types of movements (i.e. bringing arms back or overhead, back bends, etc) and exhale in “closing” types of movements (i.e. folding forward, rounding the back) Encourage students to breathe in through their nose, if possible. This helps keep their bodies warm, helps filter the air they inhale, and helps keep breathing more smooth and the breath rate slower. Often when students try a new pose, they tend to hold their breath, so remind students to breathe throughout the practice.
-
- Use positive reinforcement:
When you see someone doing something correctly, mention it to them and let them know you’ve noticed their progress.
- Donec porta ultricies urna, faucibus magna dapibus.
- Etiam varius tortor ut ligula facilisis varius in a leo
- Folutpat tempor tur duis mattis dapibus, felis amet.
Sign up for email updates
Enjoy many exclusive benefits. Be the first to learn about all our upcoming programs.
Conquering anxieties about becoming a yoga teacher
Anxieties about becoming a yoga teacher?
Get over it with these easy steps!
It is pretty normal when you are on the verge of something new to feel anxious and juggle questions in your mind. Contemplating yoga teacher training is a big step and there might be a few of the following anxieties lurking on the back of your head.
- Am I ready to spend the money?
- How am I going to devote the time?
- Ready enough to take on the challenge?
- Will I resonate with my teacher?
- What about after the training? How can I have a successful yoga career or business?
- Am I ready to spend the money?
- How am I going to devote the time?
- Am I ready enough to take on the challenge?
- Will I resonate with my teacher?
- What about after the training?
Yoga teacher training requires a financial commitment. It’s important that you find a training that respects the financial investment you are making and that will do their best to honor that and to make sure you have a worthwhile investment. If your goal is to have a part-time or full time career that is related to yoga, then look for trainings that not only train you to be an incredible teacher, but also work with you on business planning and career strategies for new yoga teachers.
Yoga teacher training requires a commitment of time. It can be helpful to find trainings that have smaller groups, or that integrate some online studies, in order to make your training more efficient and with a focus on getting you to the end. When teacher trainings get too big, individual students can sometimes fall through the cracks and finishing their requirements drags on. Find a training that is organized, smaller, and may incorporate the use of technology to ensure that you complete your training in a timely manner.
Some students worry that they need to have a perfect looking yoga practice before they can join teacher training. This is far from the truth. As a teacher, it is most important that you are able to communicate effectively with students, and that you understand how to provide a safe and effective yoga practice for all different types of bodies. Whether you can “do” a specific yoga posture or not is irrelevant. It’s most important that you learn how to explain step by step to your students the techniques for practicing postures in ways that are both safe and challenging, while creating an environment that provides a positive experience for everyone.
Take some time to get to know your trainer’s style and personality. You can do this by attending their class, or by talking to them on the phone. Get to know the actual person who will train you, rather than the image or name recognition. When you feel a connection with your trainer, it will be easier to communicate with them about your hopes for your training.
Look for trainings that focus on both the best practices in yoga teaching, as well as best practices for a successful yoga business or career. Also, check that your trainer will still be available to answer questions after the training is over, and that you will have resources that you can keep and refer back to whenever necessary.
In the end, being a yoga teacher or running a yoga business is a wonderful gift to the world and to yourself. Best wishes on your yoga journey!
Yoga is not about being better than anyone else. It’s about becoming the best version of yourself.
Sign up for email updates
Enjoy many exclusive benefits. Be the first to learn about all our upcoming programs.
Eating breakfast cuts inches off?
We brought you the t-shirt workout to help you carve the perfect torso. Now, we’re going one step further by bringing you the sleeveless t-shirt workout. This routine was designed to target the key muscles of your upper body that must look good if you’re going to dare go sleeveless: your biceps, delts, shoulders, and upper back. “Inverting the body with the Handstand Pushup, then having the arms go to pre-exhaustion fills the arms with blood, priming them for a great pump with the barbell curls,” says Corey Burnham, who programmed this routine. “Anybody can make a bicep look impressive when they curl their arm, but to have impressive arms even when they are straight by your side means that you have been doing the right, full body exercises,” says Burnhamwho notes that the Barbell Curl is one of the best moves for accomplishing this goal. “Go as heavy as possible on these, but keep very good form,” he notes.
What’s more: You’ll also hit your abs: “Having super buff arms without core engagement leads to poor athleticism and is not a good look for the summer,” says Burnham who added in Handstand Pushups and Pledge Planks to help activate your core in a way that forces them to dynamically stabilize the entire body.
“Fitness is not about being better than someone else… IT IS ABOUT BEING BETTER THAN YOU USED TO BE.
— Gordon Slanquit, Personal Trainer Association
When you’re finished with your workout, hang from a pull-up bar and simply relax. Then, walk on the treadmill or outside for about 15 minutes to improve circulation and ensure that your arms recover adequately.
Do this routine two to three days a week, but vary the volume of sets based on feel.
But, don’t stop after the workout ends. Use your arms throughout the day: make a fist, lift objects, glove up and hit a bag, carry your office bag with your grip, not your shoulder.
- Here’s how it works:
Perform the first three moves one after another (Handstand Pushup Hold, Pledge Plank, Barbell Curl).
Rest 45-60 seconds between exercises.
That’s one set. Do up to 5-8 sets of these. Then, move on to the final two moves. Complete as many sets as possible with 30 seconds rest maximum. “You go until your form breaks, meaning you have nothing left”
Sign up for email updates
Enjoy many exclusive benefits. Be the first to learn about all our upcoming programs.
Ginger is not just simple food
- How to Make a Smoothie With Ginger : Recipe for Smoothies
Sign up for email updates
Enjoy many exclusive benefits. Be the first to learn about all our upcoming programs.
One day in life of a Health Coach
Sign up for email updates
Enjoy many exclusive benefits. Be the first to learn about all our upcoming programs.
The Best Tips And Workouts!
We met two of the workers in the middle of the tire yard. It was like an arena of sorts, full of nothing but concrete and tires. The first tire they pulled down on the forklift looked pretty damned big.
I volunteered to go first, and it took what seemed like a lifetime to flip that beast. I wrestled it up and finally pushed it over. It felt like a street fight, and I was crushed after that one rep. My buddy tried to flip the tire, with no luck, so we reluctantly asked the forklift operator to pull down a smaller tire.
FLIPPING TIRES IS AN ACTIVITY THAT’S WORTH YOUR TIME, BUT EVEN MORE THAN THAT, WORTH YOUR RESPECT.
This tire was 400 or 500 pounds, and we took turns flipping it for 10 or 15 minutes. The two tire-yard workers watched us as they smoked cigarettes. We hesitated to admit it, but pretty quickly, we were done. That’s when the guys put down their cigarettes and said they’d finally show us how to flip tires.
They tore through those tires with ease. Where my buddy and I struggled to manage 2-3 reps, these guys flipped the tire for 5 and 6 reps with ease. When they both finished, they laughed, looked at me and my buddy, and said one word: “Easy!”
I laughed, but deep down, I was embarrassed and angry—angry that my buddy and I looked strong and impressive by “normal” standards, but our ability to demonstrate that strength outside of the gym was subpar.
Since then, I’ve flipped a lot of tires, and I’ve taught a lot of people to do it as well. It’s an activity that’s worth your time, but even more than that, worth your respect. Here’s where to start.
“Fitness is not about being better than someone else… IT IS ABOUT BEING BETTER THAN YOU USED TO BE.”— Gordon Slanquit, Personal Trainer Association
When you’re finished with your workout, hang from a pull-up bar and simply relax. Then, walk on the treadmill or outside for about 15 minutes to improve circulation and ensure that your arms recover adequately.
Do this routine two to three days a week, but vary the volume of sets based on feel.
But, don’t stop after the workout ends. Use your arms throughout the day: make a fist, lift objects, glove up and hit a bag, carry your office bag with your grip, not your shoulde
- Here’s how it works
Perform the first three moves one after another (Handstand Pushup Hold, Pledge Plank, Barbell Curl). Rest 45-60 seconds between exercises. That’s one set. Do up to 5-8 sets of these. Then, move on to the final two moves. Complete as many sets as possible with 30 seconds rest maximum. “You go until your form breaks, meaning you have nothing left”
Sign up for email updates
Enjoy many exclusive benefits. Be the first to learn about all our upcoming programs.
4 Ways to Balance the Root Chakra (Muladhara)
- 4 Ways Your Students can Balance their Root Chakra (Muladhara)
- Problems with the Root Chakra
- Easy Seated Pose (Sukhasana)
- Mountain Pose (Tadasana)
- Standing Wide Leg Forward Fold
- Seated One Leg Head to Knee Forward Fold (Janu Sirsasana)
Many people struggle with an imbalanced first charka. The first chakra is like a gate for the other energy centers and it must stay in equilibrium. Root Charka’s Sanskrit name is Muladhara. The word ‘Mula’ means root and ‘Adhara’ means foundation. Therefore, Muladhara is the core foundation of our spiritual development. The ultimate goal of every yogi is to open and utilize the Root Chakra. It is the base camp of the ultimate summit – human consciousness.
The Root Chakra is the first important wheel of the energy of the seven inner chakras of the human body. Chakras are like “spinning wheels” of energy. Each chakra contributes to a part of our subtle body. Chakras are also associated with specific organs. The Root Chakra is associated with the adrenal gland.
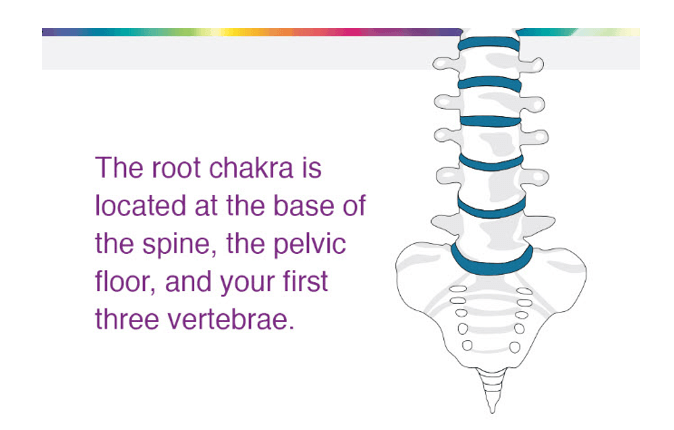
Location: Root Charka is located at the absolute end of the spinal column. The first piece of the spinal cord is the Coccyx which is right above the Root Chakra.
As you probably already know, muscles can’t grow if they receive subpar training. If you really want to make your calves stand-out, you must start training them the way you train your back or chest: fresh, from every angle, and to complete exhaustion. This location of the body is also the home for Kundalini Shakti, which in Hinduism means Devine Energy. The Root Chakra is part of the Lower Three Chakras who are considered masculine; they call us to action; they also help to ground us and are usually concerned with issues in the material world. Root Chakra is the energy center for the blood, bladder, kidneys, male reproductive organs, and feet.
When people experience and overactive Root Chakra, they can be bossy, domineering, egoistic, greedy, and even violent.
When people experience an underactive Root Chakra, they can be uninvolved sexuality, disinterested of intimacy, inadequate with slow cognitive functions, often frustrated, fearful and even deeply depressed.
When people have a balanced Root Chakra, they are approachable, grounded, with a sense of belonging, trusting and independent.
Here are a few notes on how you can recognize the behavior of unbalanced Root Chakra. The typical signs of unbalanced Root Chakra are to be often afraid, very self-protective and overreactive, replaying the “what if” scenario, and easily feeding the feeling of fear with imaginative problems and a multitude of bad variation scenarios. Generally, when we are afraid, we live in our heads. Our minds create re-run on most decisions and we portray mistakes from the past. We disconnect from what is happening in the present moment. Our connection to inner-self and intuition is lost. To regain equilibrium, yoga teaches us drawing our attention out of our heads and down into our bodies. Yoga also works to move energy in our body even when we are not focusing on it. When we recognize that we need to work on aligning a particular charka, certain yoga poses to help.
hen training your calves, throw conventional rep ranges out the window. I never do less than 20 reps per set when I train my calves. Usually, I aim for 25-30 reps.
Tip for students: “Bring awareness to the bottom of the spine as chanting with deep breaths. Imagine a beaming red light coming from the bottom of your body and spreading upwards towards every corner of your body. Chant confidently, loudly. Hold in a meditative state for as long a desired, but attempt at least 5-10min, 3/day every day for 7 days. Chanting can be Oam or a self-loving chant of choice. Music can be played from the many free options on YouTube of Aum Chanting. Best is to focus on own voice and chant.”
Tip for students: “As you stand, play with shifting your weight off-center. Lean forward, back, then to the right, and the left. Find the place where your weight is evenly distributed, focus on that place of equilibrium. Remember it. Come back to it. Rely on it. Trust it. Love it. Gift it with love and energy. Cherish your ability to balance with grace. Firmly press your weight into the earth, even spread your toes and imagine how you are rooted deeply. Pretend you a tree that no one can move. Pretend that no wind, no rain, no sun…no storm can move the balance of your roots.”
Tip for students: “Take a wider step and slowly, breath by breath overcoming fear and vulnerability, with a flat back, gaze forward, dive down chin pointing to the ground. Take at least five deep breaths into the pose. When you come out of the pose, hold your hips with your hands, press into the earth with your feet, and rise with a long flat spine with a flat back slowly. Repeat every day. Trust you balance when you press your feet. With time this pose will improve more and more.”
Tip for students: “Before getting into this pose, do a sit-up using momentum. When doing the sit-up, do it with a big inhalation. Wiggle hips right and left a few times, even lift them as if you are trying to pull them away from the body and sit on the hip bones firmly. Be confident. Grab the toes with 1st, 2nd and 3rd fingers. Pull the belly button to your spine and with an exhale, and without bending knees, touch elbows to the floor on both sides of your legs, chin facing forward, and place head on legs (if possible). Stay for 20 seconds. Grow into it. This pose is a challenge even for advanced students. Be confident and know that repetition is the mother of success. ”
“Fitness is not about being better than someone else… IT IS ABOUT BEING BETTER THAN YOU USED TO BE.
Gordon Slanquit, Personal Trainer Association
- When you’re finished with your workout, hang from a pull-up bar and simply relax. Then, walk on the treadmill or outside for about 15 minutes to improve circulation and ensure that your arms recover adequately.
- Do this routine two to three days a week, but vary the volume of sets based on feel.
- But, don’t stop after the workout ends. Use your arms throughout the day: make a fist, lift objects, glove up and hit a bag, carry your office bag with your grip, not your shoulder.
- Here’s how it works
Perform the first three moves one after another (Handstand Pushup Hold, Pledge Plank, Barbell Curl). Rest 45-60 seconds between exercises. That’s one set. Do up to 5-8 sets of these. Then, move on to the final two moves. Complete as many sets as possible with 30 seconds rest maximum. “You go until your form breaks, meaning you have nothing left”


